Overview
Trim mode lets you remove unwanted sections from your videos. Whether you need to cut out a shaky start, remove dead air at the end, or extract a specific portion from a longer clip, SnapTrim makes it quick and easy.
For more complex edits, you can use multiple segments to keep several non-contiguous portions of a video and discard the gaps between them.
Entering Trim Mode
Click the Trim segment in the mode selector at the top of the window to enter trim mode. The Trim Settings panel appears on the right side of the window, and the timeline shows draggable trim handles.
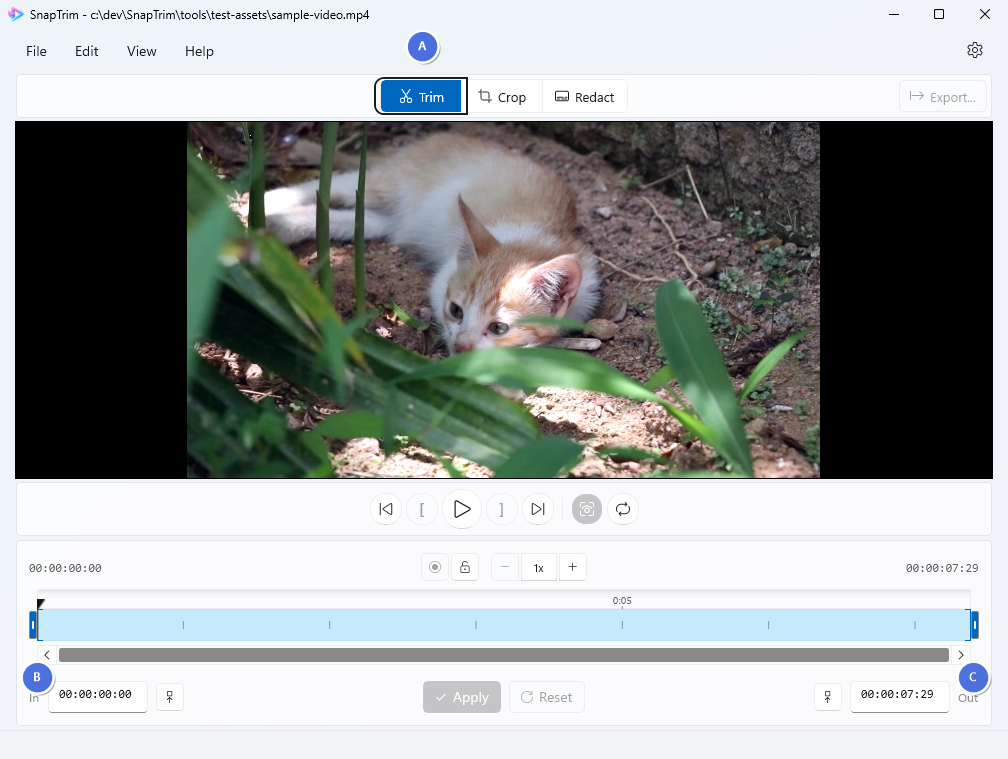
- A - Trim mode button (click to enter trim mode)
- B - Trim Settings panel (timecodes, set-to-playhead buttons, and apply/reset controls)
- C - Timeline with trim handles (drag to set where the video begins and ends)
Setting Trim Points
There are three ways to set your trim start and end points:
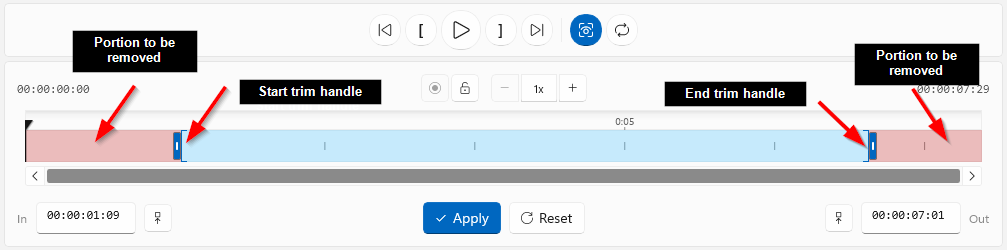
Method 1: Drag the Timeline Handles
The quickest way to set trim points:
- Drag the left handle on the timeline to set where the video begins
- Drag the right handle to set where the video ends
- The red overlay shows the portions that will be removed
Method 2: Use the Playhead
For more precise positioning:
- Scrub to the desired position using the playhead
- In the Trim Settings panel, click the Set to Playhead button (arrow icon) next to the In or Out timecode box
- The corresponding trim handle will snap to the playhead position
This method is useful when you want to set the trim point at a specific moment you’ve found while watching the video.
Method 3: Enter Timecodes Manually
For frame-accurate trimming:
- In the Trim Settings panel, click directly in the In timecode box to set the start point
- Click in the Out timecode box to set the end point
- Type the timecode in the format HH:MM:SS:FF (hours:minutes:seconds:frames)
Previewing Your Trim
Before committing to your trim, you can preview exactly what will be kept:
- Trim Preview Toggle: Enable this to constrain playback to only the trimmed region
- Press Play to watch the trimmed portion and verify your selection
- Use the Go to Trim Start and Go to Trim End buttons (bracket icons) to jump directly to your trim boundaries
Applying the Trim
Once you’re happy with your trim points, use the buttons at the bottom of the Trim Settings panel:
- Click Apply to lock in the trim region
- The timeline collapses to show only the trimmed portion
- The video preview updates to reflect the new duration

If you need to make changes after applying:
- Click Edit to return to editing mode and adjust your trim points
- Click Cancel to discard your edits and restore the previously applied state (or press Escape)
- Click Reset to clear all trim settings and return to the full video
Note: The Cancel button and Escape shortcut only appear when editing a previously applied trim.
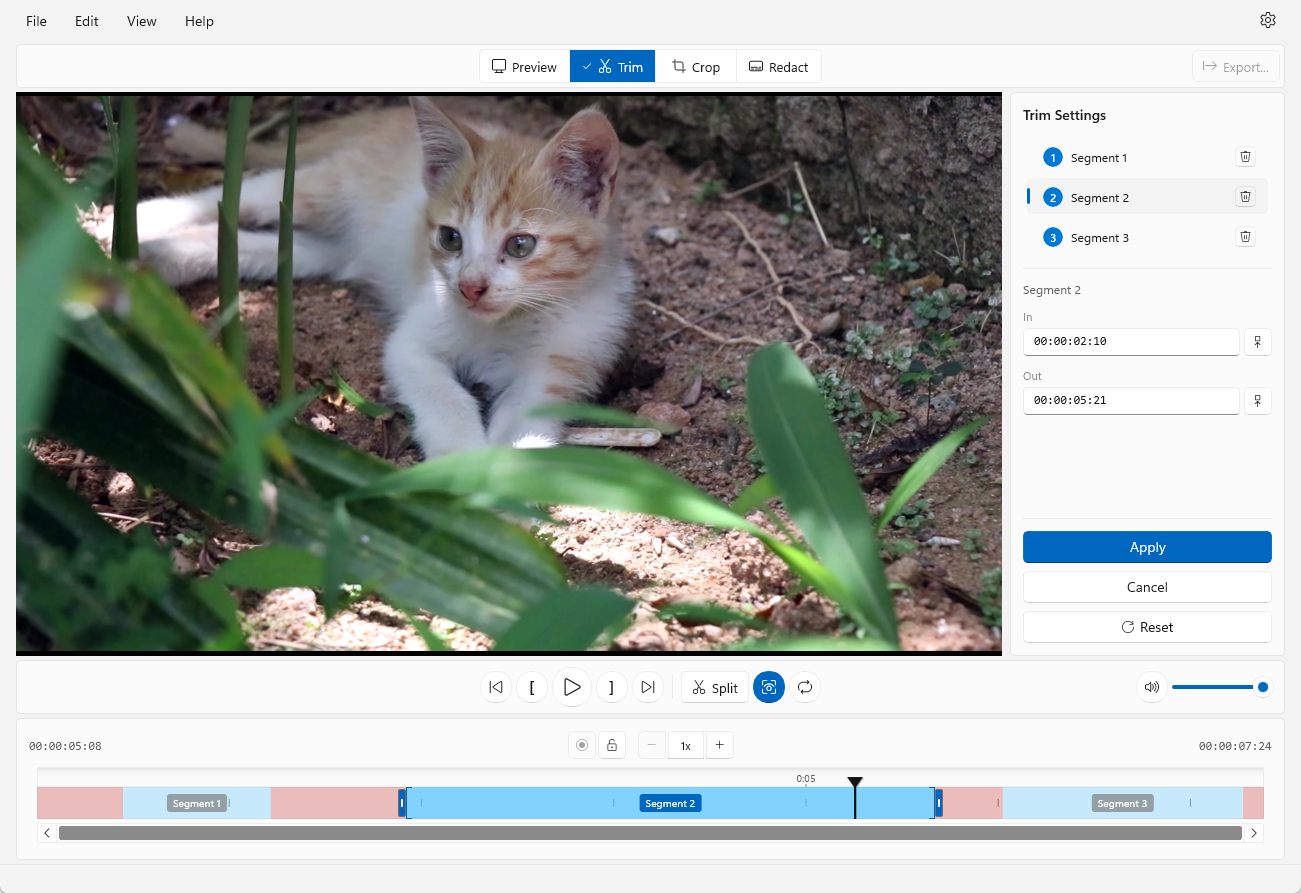
Multiple Segments
By default, trimming keeps a single continuous portion of your video. Multiple segments let you keep several separate portions and discard everything in between — perfect for removing unwanted sections from the middle of a video.
Splitting a Segment
To create multiple segments, split an existing segment at the playhead position:
- Position the playhead at the point where you want to split
- Click the Split Segment button (scissors icon) in the playback toolbar

The segment is divided into two at the playhead position, and the right-hand segment is automatically selected.
Note: Each segment must be at least 0.5 seconds long. The split button is disabled if either of the resulting segments would be too short.
Selecting Segments
Click on any segment in the timeline to select it, or select it from the segment list in the Trim Settings panel. The selected segment is highlighted with a brighter colour, and the trim handles update to reflect its boundaries.

Each segment is labelled with a number (“Segment 1”, “Segment 2”, etc.) in both the timeline and the segment list, so you can easily identify them.
Adjusting Segment Boundaries
Once a segment is selected, you can adjust its boundaries using the same methods as single-segment trimming:
- Drag the trim handles on the timeline to resize the selected segment
- Use the playhead with the Set to Playhead buttons in the Trim Settings panel
- Enter timecodes manually in the In/Out boxes in the Trim Settings panel
Deleting a Segment
To remove a segment you no longer need:
- Click on the segment in the timeline or the segment list to select it
- Press the Delete key, or click the delete button (trash icon) next to the segment in the segment list
The segment is removed and selection moves to an adjacent segment. You must always have at least one segment — the Delete key and delete buttons are disabled when only one segment remains.
Note: The delete buttons in the segment list are hidden when the trim is applied. Use Edit to return to editing mode before deleting segments.
Playback with Multiple Segments
Use the Trim Preview button in the playback toolbar (next to the Split button) to preview your multi-segment trim. When enabled, playback skips the gaps between segments for a seamless preview of the final result.
- Click the Trim Preview button to toggle between gapless playback (skips excluded sections) and full timeline mode (plays through gaps)

Exporting with Multiple Segments
When you export a video with multiple segments, SnapTrim processes each segment and joins them together into a single output file. The export dialog shows the number of segments and total kept duration.
Tips
- Non-destructive workflow: The Apply/Edit workflow means you can always adjust — nothing is permanent until you export
- Combine with cropping: Trimming works alongside cropping for complete video editing in one session
- Undo and redo: All segment operations (split, delete, resize) can be undone with Ctrl+Z and redone with Ctrl+Y
- Multiple segments: Use split and delete to keep only the portions you need from anywhere in the video
What’s Next?
- Cropping Videos — Learn to resize and reframe your videos
- Exporting Videos — Save your edited video